|
The software has made the job of writing a script simplified and has indeed brought in a new dawn for the screenplay writer across the globe. There is a myriad of options to choose from, well here we are shortlisting some of the best screenwriting software for Windows: 1. Trelby is free multi-platform and open source screenwriting program available for Windows and Linux. Storytouch is screenwriting software available for the Mac and PC. It includes graphs and color pallets that help you analyze your script. Storytouch has a free and a fee-based version. You can find the manual here. Return Policy Your satisfaction is our top priority. If you are not satisfied with your purchase, please return the item(s) for an exchange or refund within 30 days from the purchase date, unless otherwise noted on the product page. Ship the item(s) to The Writers Store via a traceable and insured method. You will be responsible for return shipping fees. 
Please include a completed Return Form with your shipment. Refunds take up to one week to process once we have received the item(s). Software returns must be deactivated and uninstalled from your computer before a refund may be issued. Please contact the software manufacturer if you need assistance uninstalling or deactivating your software. The following items are not returnable: Hollywood Creative Directories, DVDs (opened), and Gift Certificates. Your Satisfaction is Our Goal. Get your copy of Final Draft® 11 from The Writers Store, the Industry's #1 screenwriting software source for over 30 years, and you'll receive free installation support, as well as peace of mind knowing that your purchase is backed by our 30-day money-back guarantee. Plus, you'll have ongoing access to your download and serial number through your Writers Store account. When you're ready to write a screenplay, you want only the best screenwriting software to help you get to from initial concept to FADE OUT. That's why you need the all-new Final Draft 11, the number-one-selling software designed specifically to write scripts for film, television, and theater. Final Draft automatically formats and paginates your script to Industry standards with just two simple keystrokes. Final Draft 11 retains all of its studio-tested features used by Hollywood giants like Tom Hanks, J.J. Abrams, James Cameron, and Aaron Sorkin, while setting new benchmarks in performance and ease of use. With Final Draft 11, you'll enjoy many new and improved features, plus a fresh look and feel for both Mac and Windows users. NEW AND IMPROVED FEATURES NEW IMAGE SUPPORT Insert images into your script, title page or the Beat Board™ to help visualize your story. MAC WINDOWS Click image to enlarge Click image to enlarge NEW TAGGING Track and report on customizable story elements. 
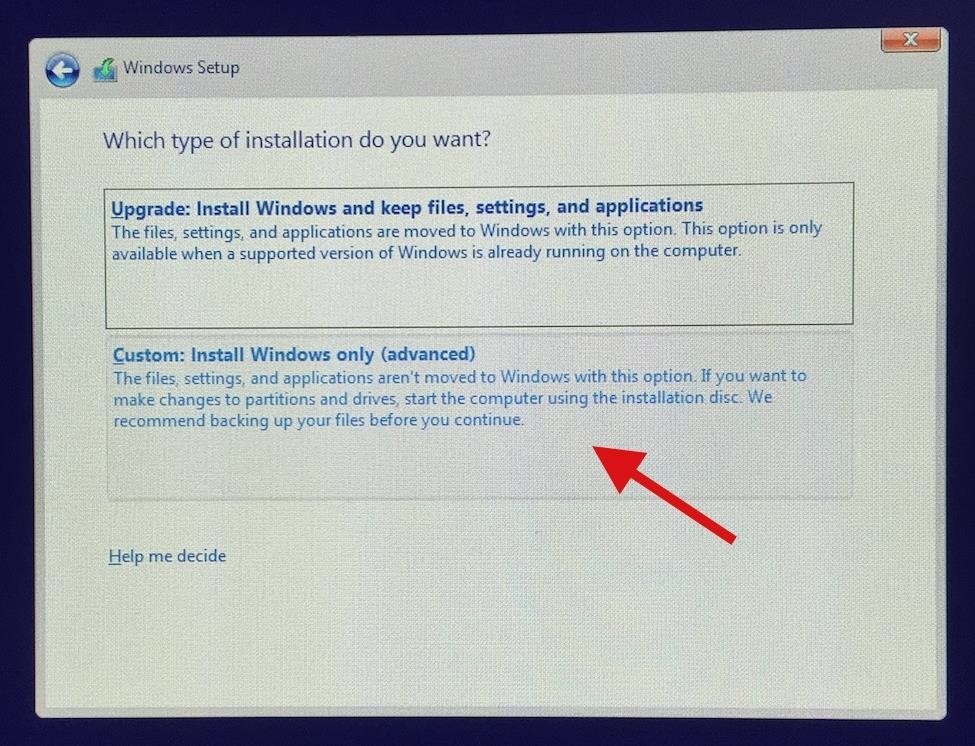
Break down scripts for scheduling and budgeting. MAC WINDOWS Click image to enlarge Click image to enlarge IMPROVED COLLABORATION Simultaneously edit your script remotely in real-time with writing partners. MAC WINDOWS Click image to enlarge Click image to enlarge IMPROVED BEAT BOARD™ Add images to beats by dragging and dropping, drag content to and from the script while retaining formatting, color code with new vibrant custom colors, snap beats to grid, zoom, and export to PDF. MAC WINDOWS Click image to enlarge Click image to enlarge NEW NIGHT MODE Quickly shift to a dark screen for easier viewing when writing. MAC WINDOWS Click image to enlarge Click image to enlarge IMPROVED STORY MAP™ See images in your Beats and Structure Points. MAC WINDOWS Click image to enlarge Click image to enlarge NEW SPEECH TO SCRIPT (Mac Only) Use the Mac’s built-in dictation with the Final Draft Speech to Script feature for hands-free writing that’s as fast as your ideas. MAC Click image to enlarge NEW MULTI-LANGUAGE SUPPORT Write in over 95 different languages. I cannot proceed with the installation, and I cannot locate the log files. I am using Boot Camp running in OS X 10.11.3 to install Windows 10 on a 'Late 2013' iMac with a 1TB hard drive. I have completely reformatted the hard-drive and reinstalled the system from Time Machine, but I continue to get the same message. For more information see the setup log files.'
0 Comments
Last updated: March 9, 2017 Learning how to print the outline view in Powerpoint 2010 is a valuable skill for someone that spends a lot of times working with Powerpoint presentations. Many presentations can be incredibly large, and printing out every slide can be both unwieldy and unproductive. But the outline view in Powerpoint 2010 provides a summarized version of your spreadsheet’s information, and printing an outline from Powerpoint 2010 can give you a condensed list of the slides and the information contained on them. While we have previously discussed ways to and in Powerpoint 2010, one of those options might not be ideal for every situation. Sometimes you want to print out a short summary of the information contained in your slideshow, whether it is for you or your audience. Note: Instructions in this article apply to PowerPoint 2016, 2013, 2010, PowerPoint for Mac, and PowerPoint 365/Online. How to Print Speaker Notes in PowerPoint 2016 The process for printing presentation slides with notes is pretty straightforward when you’re using a recent version of PowerPoint on a PC. Creating a PDF presentation with notes and slide images using PowerPoint for Mac _. If you want to create a PDF with an image of the PowerPoint slide ONLY, click the [Print What] menu and select [Slides]. Pull down the menu for [PDF] at the bottom of the window. Luckily Powerpoint 2010 also generates an outline from your slideshow information, so you will want to learn how to print an outline from Powerpoint 2010. Generally speaking, an outline will usually be much smaller than if you printed handouts for everyone in your audience, as the outline will only include the text from your slides. This will reduce the amount of paper that you use and will present the bulk of your slideshow information in a format that is easy to manage. Printing Outlines in Powerpoint 2010 The outline of your slideshow in Powerpoint is something that Powerpoint generates automatically. You do not need to do anything special for the outline to be created. Classic mac os emulator. It will take all of the text on each of your slides, then it will organize that information, by slide, into one complete outline document. You can follow the steps below to learn how to print your outline in Powerpoint 2010. Step 1: Double-click your Powerpoint presentation to open the slideshow in Powerpoint 2010. Step 2: Check each slide to ensure that you have included all of your text information, and that everything is spelled correctly. Note that there is a spell check utility available in the Proofing section of the ribbon on the Review tab. Step 3: Click the File tab at the top-left corner of the window. Step 4: Click Print in the column at the left side of the window. Step 5: Click the Full Page Slides drop-down menu at the center of the window, then click the Outline option in the top section. Step 6: Check the outline document in the preview section at the right side of the window to see what information will be included on the printout. If something is incorrect or does not make sense without also including a video or image to which it refers, then consider revising the text so that it is more helpful in the outline format. Step 7: Click the Print button at the top of the window to print out the outline document.

Summary – how to print an outline view in Powerpoint 2010 • Click the File tab at the top-left corner of the window. • Click Print in the left column. • Click the second dropdown menu (it says Full Page Slides by default), then click the Outline option. • Confirm that the outline is correct, then click the Print button. Would a slide in your presentation, or even the entire presentation itself, look better in portrait orientation? 
Learn and look at your slide shows from a different perspective. • • • • • • Many users of PowerPoint, or any other presentation software, only know the fundamental features of those applications such as creating a nice presentation document and running slide-shows with fancy transition effects. It is quite unfortunate that many trainers forget to teach their PowerPoint class about the importance of using in their presentations. Speaker Notes are an important tool in ensuring a smooth presentation of your work. Your presentation can be presented by another speaker as he will be able to know what to say when every slide in the presentation appears. They are a short paragraph that reminds the speaker of the contents of the current slide in the slide-show. The most interesting thing about them is the fact that they are not viewable by the audience during a presentation. There are two simple ways to add speaker notes to a PowerPoint slide. I will show you the simplest: Adding notes in PowerPoint using the Notes pane In the Normal View of your PowerPoint document, select the slide that you want to add notes for by clicking on it on the tile of slides on the left hand side of the window. As for those registered on the free Apple Public Beta Program, the company has confirmed that Sierra will be available to public testers in July. MacBook, MacBook Pro, MacBook Air, Mac mini, and Mac Pro, are capable of installing and executing the latest macOS. For full compatibility. Download MacOS Sierra via torrent or dirrent links. MacOS High Sierra introduces new core technologies that improve the most important functions of your Mac. From rearchitecting how it stores your data to improving the efficiency of video streaming to unleashing the full power of your graphics processor, it’s all central to today’s Mac experience. How much to partition for windows 10 on mac bootcamp. • Apple File System. Your data is under new management. 
Your documents. To your Mac, everything you care about is data. And a file system is what organizes all that data into files and folders you can access with a click. Our current file system was designed in What's New in macOS High Sierra. MacOS High Sierra introduces new core technologies that improve the most important functions of your Mac. From rearchitecting how it stores your data to improving the efficiency of video streaming to unleashing the full power of your graphics processor, it’s all central to today’s Mac experience. • Apple File System. Your data is under new management. Your documents. However, its one main problem is that it has the pre-requisite that VirtualField wishes to be put in at the Mac in query. Mac os emulator in browser. Andy OS Android App Emulator for Mac OS Andy OS is every other widely recognized and fashionable Android emulator for Mac with an overly consumer pleasant interface identical to its fellows in this record. If this is noticed to, this can be a nice Android emulator. To your Mac, everything you care about is data. And a file system is what organizes all that data into files and folders you can access with a click. Our current file system was designed in the early days of Mac, and it has performed beautifully ever since. But today’s flash‑based Mac systems open up new possibilities for innovation, so it’s time to lay a new foundation. With macOS High Sierra, we’re introducing the Apple File System to every Mac with all‑flash internal storage, with an advanced architecture that brings a new level of security and responsiveness. The new standard for video. With the rising popularity of 4K video, a new industry standard arrives on Mac - HEVC (High Efficiency Video Coding, also known as H.265).1 It can compress video up to 40 percent more than H.264, the current standard for video compression. Using HEVC, videos stream better and take up less space on your Mac, while preserving the same visual quality. A graphics game changer. Today’s Mac experience relies more than ever on the graphics processor (GPU) in your computer. And GPUs are becoming more and more powerful. Metal is a technology built into macOS that allows apps to unleash the full power of the GPU. Now Metal 2 not only takes the visual experience to the next level, but also adds capabilities like machine learning, virtual reality, and external GPU support for entertainment and professional creative apps. Whether you play games, create content, or develop software, Metal 2 provides the power to bring your imagination to life. • Virtual reality for Mac. It’s a whole new world. MacOS High Sierra lets developers create interactive virtual reality experiences on Mac for the first time, using the new iMac with Retina 5K display, the new iMac Pro coming in late 2017, or any supported Mac paired with an external GPU.3 With optimized support for Valve’s SteamVR and the HTC Vive VR headset, and content creation apps like Final Cut Pro X, Epic Unreal 4 Editor, and Unity Editor, developers have everything they need to create immersive new worlds for you to explore. Version 10.13.6: Note: Combo and delta updates are available in Related Links, as is the update specific to the new iMac Pro. The macOS High Sierra 10.13.6 update adds AirPlay 2 multi-room audio support for iTunes and improves the stability and security of your Mac. AirPlay 2 for iTunes • Control your home audio system and AirPlay 2-enabled speakers throughout your house • Play music at the same time on multiple AirPlay 2-enabled speakers in your house, all in sync Other improvements and fixes • Fixes an issue that may prevent Photos from recognizing AVCHD media from some cameras • Fixes an issue that may prevent Mail users from moving a message from Gmail to another account. Step 1: Check if your certificate is installed • Open Chrome. • In the address bar, type chrome://settings/certificates and press Enter. • Select Authorities. • Using information from your administrator, look for your server certificate in the list. If the server certificate isn't installed, your administrator might ask you to install the server certificate. • [Optional] If you're connecting to an EAP-TLS network, you might need to install the user certificate. For more information on setting up virtual private networks (VPNs), see. Step 2: Connect to the network • At the bottom right, select the time to open the status area. • Select Settings. • Under 'Network,' select Add connection Add Wi-Fi Advanced. • Enter your network information. • If the server certificate is installed, in the 'Server CA certificate' field, choose Default. Please follow these instructions to find the MAC Address of your Android phone or tablet: In the bottom-right corner of the screen, tap the Apps icon.; Swipe the Apps pages until you arrive at the page with the Settings icon. Hard drive is not showing up on my computer I'm using Mac OSx Yosemite Version 10.10.2 and the last time i conntected my WD External Hard Drive was just 5 days ago and I disconnected correctly etc. So it wasn't till today that I reconnected it to my laptop and it doesn't show on my desktop. Wd my passport for mac not showing up on windows. WD Passport Shows Up on my Mac but not on Windows t0pher Apr 2, 2014, 5:32 PM I just built a new PC and my WD 1TB Passport external hard drive shows up fine on my Mac laptop but won't appear on. • Select Connect. Find your MAC address or IP address Some administrators restrict network access to prevent outsiders from seeing private information on the network. To use the network, you might need to give your device's MAC or IP address to your administrator. Okay, i use my xbox one controller for steam all the time. So its not the drivers, but when i select pad 1 (which in your video its at nothing shows up. No matter what. Connect your Xbox One controller to your PC and let it be detected by Windows. Right click the Windows Start button and select Device Manager. Navigate to the Microsoft Xbox One controller entry. Right click, select Update Driver Software and let Windows automatically download and install the drivers. Thank you for your help. I did download the newest build but it turns out the issue was with DirectInput. I had to uncheck DirectInput in the plugin and check Xinput (xbox 360 controller only). Both of those were picking up the xbox one controller but they were getting confused when both were on. Xbox one wireless controller. So if a game supports Xbox controller you might be able to play with DS controller. Another thing is the usability. If you like DS controller buy a DS controller. If you like XB controller use those. I have both and use the XBox controller for pcsx2. Once your Mac reboots, connect your Xbox One controller using a Micro-USB to Type A USB cable and you’ll see the controller’s Xbox light turn on if the driver installation was successful. To find the MAC or IP address: • If you haven't yet, sign in to your device. • At the bottom right, select the time to open the status area. • Select the Wi-Fi network. • At the top of the box, select Information. • You'll see your device's IP address and IPv6 address. 
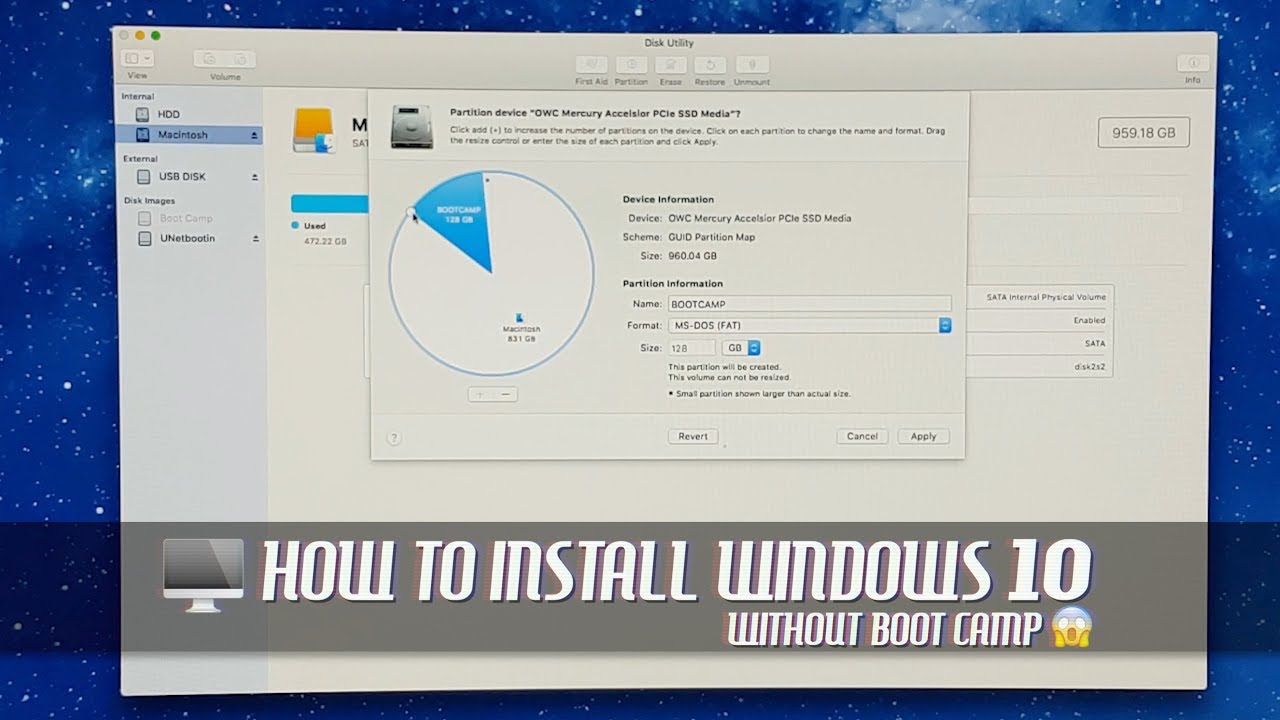
Your MAC address is labeled 'Wi-Fi.' Wi-Fi networks that work with your device • Open networks that don't require a password • Secure networks that use WEP, Dynamic WEP, WPA-PSK, WPA-Enterprise, or WPA2-Enterprise settings • We recommend WPA2, as it is more secure than WEP or WPA • Standards: 802.11 a/b/g/n and 802.11ac for AC-equipped ChromeOS devices Related articles • • •. You have two options for finding your Chromebook's MAC address: • Use the Networks panel near the clock: • Visit Google's. • Scroll down to Find the Media Access Control (MAC) address. Click to expand the section, and follow the instructions. • Use the browser's 'About System' diagnostic page: • Open a browser window. In the address bar, type chrome://system, and press Enter. • Look for ifconfig, and then click the Expand. Button next to it. • Look for either the eth0 section (wired MAC address) or the wlan0 section (wireless address). In both sections, the MAC address will be listed as the Ethernet HWaddr. If you haven't set up your Chromebook and are seeing the Chrome 'Welcome!' Screen, there's a third way to find the MAC address. On the welcome screen, below the Select your language: and Select your keyboard: drop-down menus, you will see a Select a network menu. Expand that menu to see the MAC address (or addresses, if your Chromebook also has an Ethernet port) listed at the bottom. If you have more than one MAC address, they will be identified as 'Ethernet' (the wired connection's MAC address) and 'WI-FI' (the wireless connection's MAC address). Feb 17, 2017 - Eject the USB drive before removing it from the Mac. Format as OS X Extended (Journaled) and select Scheme as GUID Partition Map. For example, if you want to change the partition map of a USB, Thunderbolt, or other storage device from Master Boot Record to GUID Partition Map. If you simply want to erase a volume, see Erase a volume. Important: As a precaution, it’s best to before creating new partitions on your device. • In the Disk Utility app on your Mac, choose View > Show All Devices. • Select an existing APFS volume in the sidebar, then click the Add Volume button. • Enter a name for the new APFS volume. • Click the Format pop-up menu, then choose a format. • APFS: Uses the Apple File System format, recommended for volumes using macOS 10.13 or later. • APFS (Encrypted): Uses the Apple File System format and encrypts the partition. 
• APFS (Case-sensitive): Uses the Apple File System format and is case-sensitive to file and folder names. For example, folders named “Homework” and “HOMEWORK” are two different folders. • APFS (Case-sensitive, Encrypted): Uses the Apple File System format, is case-sensitive to file and folder names, and encrypts the partition. For example, folders named “Homework” and “HOMEWORK” are two different folders. • If you want to manually manage APFS volume allocation, click Size Options and enter values in the fields: • Reserve Size: The optional reserve size ensures that the amount of storage will remain available for this volume. • Quota Size: The optional quota size limits how much storage the volume can allocate. When you’re done, click OK. Important: As a precaution, it’s best to before creating new partitions on your device. • In the Disk Utility app on your Mac, choose View > Show All Devices. • Select the device in the sidebar, then click the Partition button. Internal storage devices appear below the Internal section in the sidebar. External devices appear below the External section in the sidebar. When you select a volume that already has data on it, the pie chart shows a shaded area representing the amount of data on the volume and an unshaded area representing the amount of free space available for another volume. Disk Utility also reports whether the volume can be removed or resized. Does rufus work for mac. If you see a small volume with an asterisk, the partition is smaller than can be represented at the correct scale in the chart. • For each volume, click the Format pop-up menu, then choose a format. • APFS: Uses the Apple File System format, recommended for volumes using macOS 10.13 or later. • APFS (Encrypted): Uses the Apple File System format and encrypts the partition. • APFS (Case-sensitive): Uses the Apple File System format and is case-sensitive to file and folder names. For example, folders named “Homework” and “HOMEWORK” are two different folders. • APFS (Case-sensitive, Encrypted): Uses the Apple File System format, is case-sensitive to file and folder names, and encrypts the partition. For example, folders named “Homework” and “HOMEWORK” are two different folders. • Mac OS Extended (Journaled): Uses the Mac format (Journaled HFS Plus) to protect the integrity of the hierarchical file system. • Mac OS Extended (Journaled, Encrypted): Uses the Mac format, requires a password, and encrypts the partition. • Mac OS Extended (Case-sensitive, Journaled): Uses the Mac format and is case-sensitive to file and folder names. For example, folders named “Homework” and “HOMEWORK” are two different folders. 5 days ago - Pick one computer to be the host (requires that QuickBooks Server be installed), then open the file and enable multi-user mode (File > Enable Multi-user Mode). Open QuickBooks on the second computer. From the Shared Files section, open the company file. QuickBooks Pro provides options to install a multiuser mode for a single person to use on two computers or for multiple users. Each separate user must have a valid license to use the QuickBooks.  
This article refers to QuickBooks Online Starting in QuickBooks Desktop 2016, there are a number of enhancements made to make the Multi-User experience better and to reduce the time it takes to troubleshoot problems with QuickBooks Desktop over a network. The changes in 2016 are: • New and Improved database manager: When you install QuickBooks Desktop 2016 or later on your server, the database manager will now automatically perform network diagnostics for QuickBooks Desktop to function properly over a network (windows firewall ports being added, folder sharing and security checks, and ensuring the required services for QuickBooks Desktop to work over a network are started). • Improved messaging for Multi-User issues: If you are experiencing problems opening your file in a network, QuickBooks will now prompt you with updated messaging that tells you exactly how to fix the problem. • Elimination of the 'Alternate Setup Mode': In order to ensure optimum performance and stability, the new version of QuickBooks no longer supports the Alternative Setup Mode. QuickBooks Desktop requires now the database server manager to be installed and functioning properly on your server (or computer designated as the QuickBooks Host). You can restore Alternate Setup Mode by following the steps below if you need it or run into problems with hosting Multi-User access. Note: If you have a NAS or similar device, the QuickBooks Desktop 2016 and later Database Server Manager will not install since it is not a supported Windows Operating System. Please refer to the article. You can, however, activate the Alternate Setup Mode following the steps below as a workaround. Resolve H101, H202, H303, H505, or any other error relating to Multi-User access for QuickBooks Desktop 2016 or later • Ensure QuickBooks Desktop 2016 or later is installed on your server or computer acting as the QuickBooks Desktop host. • Select Windows Start > All Programs > QuickBooks > QuickBooks DataBase Server Manager. • Ensure the folder that contains your company files is showing in the QuickBooks Database Server Manager. Note: If your company file folder is not displayed, select Browse, then go to the location you store your file. • Select Start Scan and wait until the process finishes. • Open QuickBooks Desktop in Multi-User Mode on the workstations. Note: If you are still encountering H-series errors, see for detailed instructions. Enable Alternate Setup Mode This is intended for NAS drives or similar devices and if you run into problems with Multi-User mode. Important: The following steps are technical in nature, if you're not comfortable doing it on your own, please reach out to a qualified computer professional or IT person. On each workstation, you will need to perform the following steps. Best amd video card for mac pro 4 1. You do not need to edit anything on the server or NAS drive for these steps, just the workstations that are getting H-series errors. • Make sure QuickBooks Desktop is closed and the QBW32.exe is not running in the task manager. • Go to C: ProgramData Intuit QuickBooks (Year). • Edit the QBW.ini file in notepad. • Enter ENABLENONRECOMMENDEDMODE=1 directly under the [MISC] section. It should look like this: • Save the QBW.ini file and open QuickBooks Desktop and try to switch to Multi-User mode. • When you get the H202 error again, you should see the Alternate Setup button has returned if the.ini file has been correctly edited. Best Answer: These are the default controls for the DeSmuME Emulator. Up arrow - Up Left arrow - Left Down arrow - Down Right arrow - Right X - A button Z - B button S - X button A - Y button Q - Left Trigger W - Right Trigger Enter - Start button Right Shift - Select button To configure your own controls. Hi there, probably a stupid question but im kinda new to this whole rom and emulator thing i finally got a working ds emulator, desmume, and the rom that seems to work with it, a pokemon black rom, when i start running the rom it works fine till i get to the screen where i have to choose a new game, ive tried every button to select new game but none work, its driving me nuts, up and down arrow buttons to highlight one of the other options works but actually selecting it, i have no clue please explain it to me cause its driving me mental. Page Contents • • • • • • • What is a 2DS Emulator? An Emulator is a program that allows you to run programs or games that were not built for your particular device. For example, if you want to play a GameBoy games on your iPhone, you will need a that can run those game ROMs on your iPhone. In other words, an Emulator allows you to convert any program built for 1 OS to another. To Emulate a Nintendo DS game on your device, you will need a DS Emulator. Same for or a. Now let’s see how you can get a 2DS Emulator on any of the following devices. Best 2DS Emulator for Android As I said in the intro of this tutorial, there are a ton of emulators out there, and the best emulator is the one that you like the most. It is a personal decision in other words. I will tell you how to get Nintendo 2DS Emulator on your Android phone which I think is the best emulator. The Emulator of my choice is called HappyChick which is an All in one emulator for all of your needs. 
It is not an Emulator, but it has all the emulators inside it, and you will not need to search for the emulators for different games separately. • To download the 2DS Emulator and get it working, you will need to go to Settings of your Android phone. • Now navigate to the “Security” section and here you will want to enable the “Unknown Sources” option. This will allow you to install apps and games that are not coming from the PlayStore. • After that, open the internet browser of your choice and visit this site. Www.happychick.hk • On the next page, you will see a page where all the features of this emulator store are mentioned. At the bottom of the page, you will see the Download button. • Press the download button, and the download will start. You might see a popup saying that this file might harm your phone, just ignore that popup. • After that, Open the APK file and install it on your Android device. After that, open the app, and you will see a Chinese screen with two buttons, Agree Or Disagree. Press the Agree button, and the app will open. • Once you are inside the app, you will need to search for a 2ds game you want to play on your Android phone. As a result of the search, you will see a list of games with the game type and the language of that game. • Find the game you want to play and select it. On the next page, you will see a page with download button at the bottom end of the display. 
Press the download button, and the game will start downloading. • You will notice that two files are being downloaded. That is because the Happychick is downloading the game as well as the emulator needed to run that game. Mac photos screensaver for windows. For example, here I download Mario Kart, and the 2DS emulator is also being downloaded. • Once both of the files are downloaded, Open the “Play” section from inside the HappyChick app, and there you will see your game that you downloaded. Other than it works without root, the best feature of HappyChick is that you don’t have to download any Emulators or Game ROMs separately. All you have to do is repeat the steps to download any game. 2DS Emulator for iPhone iPhone is a bit trickier than Android because unlike Google, Apple doesn’t officially allow emulators on iPhone and you have to jailbreak your iPhone or go through some tricks to get the emulators of your choice working. There are several 2DS Emulators available from different developers like NDS4iOS that you can get without jailbreak from here. Microsoft Silverlight for Mac, free and safe download. Horrible, Magister (a tool for teachers) does not work well on Mac and not at all on Linux. I have a MacBook Pro. Silverlight is not working when I try watching movies on Netflix. A circle made of blue - Answered by a verified Mac Support Specialist. Hello, I have a MacBook Pro. Silverlight is not working when I try watching movies on Netflix. A circle made of blue dots keeps spinning. I have a question about my new apple tv. Hi, I' ve bought a Macbook pro not so long a go, it's running Mac OS X Lion 10.7.1 but the Microsoft Silverlight plugin does not seem to work, I tried everything. Reinstalling, rebooting, installing Flip4mac. Uninstalling everything correctly and installing only the plugin. I tried different browsers; google chrome, firefox, opera, safari nothing worked. The plugin is ofcourse installed correctly, I even tried running the browsers in 32bit mode (which was advised at a different forum). Flash movies are not a problem btw. I need to use the silverlight plugin to view back TV broadcast from my country. Free internet filter.  
It does not give an error when I load the movie it just give me a black screen (and no sound) and says closed. Does anyone know what to do about it? Would be much appreciated greets Bram. The solution may be as simple as opening Safari then opening Preferences under the security icon open Plug-in Settings button, check to see if the Silverlight icon is checked, if it is NOT check the box and then try opening the application or website that uses Silverlight. This should work. Also using Firefox website works too, it will indicate whether your version of Silverlight is activated or needs to be allowed for use. I hope this helps. Make sure you are allowing Silverlight software to run on your machine. Thanks for your responds guys, I took a look at Watched the demo ( ) It gives me no video (black screen) but it do gives me audio. When I go to the Silverlight section it says I have the latest version. Also when I go to case-studies section for example I am able to see the still pictures. The sites where I want to watch the broadcast streams ( & ) explicitly say they are mac-supported (I just need to download Silverlight). I am kinda an apple-noob, maybe I am making some rookie mistake? Thanks again for taking time to help me solve the problem. I followed someone else's advice (kinda) and found all the silverlight files in 'INVISIBLE FILES'. In the Finder, choose File > Find or press Command (⌘)-F. From the far-left pop-up menu (labeled “Kind”), choose Other. In the list of search attributes, select the “File invisible” checkbox, and then click OK. In the related menu, choose Invisible Items. Once loaded go to folder Private then to folder VAR then folder db theb folder Receipts scroll to any com.microsoft.silverlight item and delete. There are a bunch of them. Close, restart and install silverlight. Apple Footer • This site contains user submitted content, comments and opinions and is for informational purposes only. Apple may provide or recommend responses as a possible solution based on the information provided; every potential issue may involve several factors not detailed in the conversations captured in an electronic forum and Apple can therefore provide no guarantee as to the efficacy of any proposed solutions on the community forums. Update history for Office for Mac • 1/15/2018 • 5 minutes to read • Contributors • • • • • In this article Office for Mac that comes with an Office 365 subscription is updated on a regular basis to provide new features, security updates, and non-security updates. The following information is primarily intended for IT professionals that are deploying Office for Mac to the users in their organizations. The following table summarizes information about the most current version of Office for Mac. Office suite type Current version Release date Download link More information With Microsoft Teams 16.21 (19011500) January 16, 2019 Without Microsoft Teams 16.21 (19011500) January 16, 2019. Note • Starting with Version 16.21, Microsoft Teams will be installed by default for new installations if you're using the Office suite install package. For more information, see. • For security reason, Microsoft has deprecated the use of SHA-1. • Starting with the 16.17 release in September 2018, this information also applies to Office 2019 for Mac, which is a version of Office for Mac that’s available as a one-time purchase from a retail store or through a volume licensing agreement. • The update history information for version 16.16 and earlier also applies to Office 2016 for Mac, which is also a version of Office for Mac that’s available as a one-time purchase. Older versions up to and including 16.16 can be activated with an Office 2016 for Mac volume license. You can’t activate version 16.17 or later with an Office 2016 for Mac volume license. For information about Office 2016 for Mac releases from September onward, see • For information about the features, security updates, and non-security updates that are included in a given release of Office for Mac, see. • If you want early access to new releases, join the program.  
Most current packages for Office for Mac The following table lists the most current packages for the Office suite and for the individual applications. The Office suite includes all the individual applications, such as Word, PowerPoint, and Excel. All packages are 64-bit only. The build date is listed in parentheses, in a YYMMDD format, after the version number. The install package is used if you don't have the application already installed, while the update package is used to update an existing installation. Note Download links are only provided for the most recent releases. Aug 23, 2016 Existing Office 2016 for Mac customers will be seamlessly upgraded to 64-bit versions of Word, Excel, PowerPoint, Outlook, and OneNote as part of the August product release (version 15.25). This affects customers of all license types: Retail, Office 365 Consumer, Office 365 Commercial, and Volume License installations. The last step is to configure the network settings on your Xbox 360 console: • Press the Guide button on your controller, go to Settings, and select System Settings. • Select Network Settings. Johnny castaway screensaver for windows 10. • If prompted, select Wired Network. • Select Configure Network. • On the Basic Settings tab, select IP Settings. • Select Manual, and then select IP Address. • Enter 192.168.2.2, and then select Done. • Select Subnet Mask, enter 255.255.255.0, and then select Done. • Select Gateway, enter 192.168.2.1, and select Done. • On the Basic Settings tab, select DNS Settings. • Select Manual. Hi, I am trying to figure out whether or not I can use my Macbook Pro. Like to do is have my Xbox One connect to and display onto my Macbook. • Select Primary DNS Server. • Enter the numbers that you wrote down in Step 2: Get the DNS server address (the previous section), and then select Done. • Select Done again. Wd my passport for mac wont connect. 
• Press B on your controller, and then select Test Xbox Live Connection. Your console should now share the Internet connection that your Mac is using. Your Xbox 360 console can use this shared connection to connect to Xbox Live. For more help, post a message in the. Our forums have informative topics and knowledgeable gamers who like to help. As the title says, I'm in a bit of a predicament. I want to give my TV monitor to my brother, and use my current Desktop mac (24 inch, early 2008) as a monitor for my Xbox one. It does not have the thunderbolt cable, instead, a mini display port. I currently have an adapter set up between the Xbox and this computer, but I can't figure out how to simply switch from using the computer to using it as a monitor. Any help is really appreciated! Sorry if my wording is messy, I'm not very tech-y. |
AuthorWrite something about yourself. No need to be fancy, just an overview. Archives
March 2019
Categories |
- Blog
- Cossacks european wars windows 10 resolution
- Cossacks european wars mose doesnt move
- Windows Server 2012 R2 Remote Desktop License Crack
- Kyle landry forums mass effect piano sheet music
- Google download page
- Adhir man zale mp3 song download 320kbps
- Itunes download ios 4-2
- Shankar quantum solution 18-5-2 chegg
- Downloadable 5e character builder
- Email extractor lite 1-4 free download
- My id is gangnam beauty kissasian
- Download microsoft teams powershell module
- Malwarebyte chameleon
- Download kill me heal me sub indo
- Winx dvd ripper platinum key crack
- Download digimon sub indo
- Why is skype not working on my pc
- Mac os x tts for windows 10
- Madaari 2016 movie download
- Tokek belang sinta jojo
- Xbox mac address modem
- Write a simple android program
- Descargar smash hit premium
- Poweramp full version unlocker apk not working
- Microsoft federal employee discount for surface pro
- Ms word voice reader
- Minecraft free download mac sp


 RSS Feed
